OutdriveShop.Com
Marine Parts & Accessories
Mercruiser Precision Parts keep your engines
in good, safe operating condition.
Insist on ONLY Mercruiser Factory Parts!
Was that a grumbling noise you heard?
Did it get louder when you turned the wheel or trimmed up?
Gimbal bearings run under severe stress and can fail.
A bad gimbal bearing can crack your $3000 transom housing
Just a little water in the U-Joint bellows area and your gimbal
bearing and u-joints will be "toast".
Inspecting Your Gimbal bearing.
Usually the boat owner will suspect a gimbal bearing problem only after
they have heard a "growling" noise from the transom or drive area.
The growl will be more pronounced when the steering wheel is fully turned
to one side or the other.
Once this noise is heard immediate action must be taken to prevent further damage.
Gimbal bearings usually don't just fail on their own.
Water intrusion into the ujoint bellows or lack of lubrication
are the two main causes of failure.
By the time the boat owner hears the growling noise, water has been
entering the bellows for quite some time. This water intrusion is also
rusting the u-joint shaft assembly and from drive seal casing.
This water will eventually destroy the outdrive and the gimbal housing.
A complete inspection will require removal of the outdrive unit.
Place the shifter into forward gear before attempting to remove the drive.
The shifter MUST be in forward gear to remove or install the drive unit.
Remove the trim cylinder attachment hardware and let the cylinders hang below
the boat with the hydraulic hoses still attached. Don't damage the hoses.
Make sure they are out of the way when you start removing the drive unit.
Remove 5 (Five!)of the mounting nuts from the bell housing studs.
Do not remove the 6th nut untill you are ready to support the weight
of the drive unit when it comes loose from the bell housing.
An Alpha drive weighs 75 lbs. A Bravo III weighs over 200lbs with the props installed.
Be very careful removing the drive or you will injure yourself.
Support the drive from a hoist or lifting device as so when it releases from the bell housing
it won't drop or fall over. There is usually a loop, hole or slot in the upper drive
which will allow you to attach a lifting hook.
After the drive is supported and you have a strong friend standing there to assist
you in the removal of this "back-breaker", remove the 6th nut and pull the drive
unit back and away from the boat.
As you remove the drive from the boat you will see that the u-joint drive shaft
is pulling right out with the drive, all as one assembly.
I made this sound easier than it usually is. If your bearing was making noise
chances are water has been rusting the u-joint drive shaft and the shaft may
have actually rusted to the inner gimbal bearing race.
When this happens the drive can get stuck and it can be very difficult to remove.
Lifting the back of the drive by hand and letting it drop on it's own a few times
can help to free the drive up. Be gentle at first. You will break things if you
start to really slam the unit down. Remember, once it comes loose it could fall right
off and get damaged or injure yourself.
Stuck units usually come off about 1/4" and then no further.
A few wide chisels gently tapped into the space between the bell housing and
the front face of the drive can help.
Tap a chisel into either side down low
right above the bottom studs and then lift and drop the drive a few more times
making sure to gently tap the chisels in a little more after each drop.
Keep at it for a while being careful not to crack he housings with too much
force on the chisels and drive. Soft aluminum dents and cracks easily so take
your time and walk away from the job if you get impatient.
If the water leak has seriously rusted the u-joint shaft to the gimbal bearing
the bearing may actually come out with the drive. This is not normal.
Some drives may also be stuck in place in the drive coupler splines.
The rubber hub of the drive coupler makes it difficult to break the splines free
because it tends to just "bounce" when dropping and pulling on the drive.
In severe cases where the splines are stuck in the drive coupler we cut the shaft
inside the boat with a torch (using care and due caution of course!).
I Got It Off!
Great. That was the easy part.
Now that the drive is off you have access to inspect a few things.
You can inspect:
- Gimbal Bearing.
- U-Joint Shaft Assembly and Cross Bearings.
- Bell Housing and U-Joint Bellows
- Gimbal Housing
- Shift Shaft and Shift Shaft Seal
- Shift Cable Assembly
- Water Passage and Water Hose
- Engine Alignment
The Gimbal Bearing
The gimbal bearing is press-fit into the gimbal housing.
Look in through the bell housing (the large hole) and you will see the bearing.
The center portion should turn smooth with no crunchy feel, sticking or loosness.
Replacement of the bearing requires special tools.
Read below for Gimbal Bearing Replacement Procedure.
U-Joint Shaft Assembly and Cross Bearings
The u-joint shaft assembly is made of steel and it will rust if water gets into the bellows.
Under normal circumstances the shaft will have no rust at all.
If it has rust, water has been getting into the bellows.
The assembly has two cross bearings. The cross bearings need to be inspected.
A good cross bearing will have a "smooth firmness" to it.
Brand new bearings will allow the shaft to almost stick straight out without being supported.
Used bearings will be softer and the shaft will drop under its own weight.
Grab the u-joint shaft with both hands at either end and work the shafts in all directions
while you feel for any crunching, grinding, binding or free-play.
The cross bearings should have a velvet smooth feel in all directions with no free-play.
If the cross bearings feel bad they will have to be replaced.
We suggest you obtain a factory service manual manual to learn how.
Some drives require disassembly of the upper drive to replace the aft cross-bearing.
Pre-Alpha, Alpha One's and Alpha Gen II units all require disassembly of the upper
driveshaft housing to replace the aft cross bearing.
This procedure requires special
tools and knowledge.
Lightly grease the cross bearings with Mercruiser Cross Bearing grease.
If water comes squishing out of the bearing when you are pump in the grease
you should replace the cross bearing.
Some cross bearings have no zirt fittings. That is because they are Perma-Lube
cross bearings which do not requires greasing. The rubber seals are usually orange.
Light rust on the u-joint shaft may not be a problem.
The main concern in using a rusted u-joint shaft is the aft Yoke.
The front main oil seal for the outdrive rides on a machined surface on the aft Yoke.
Water and rust pits this normally-smooth surface making it impossible for the seal
to hold oil in the outdrive. When this seal fails, drive lube will be forced out
the front of the drive and into the u-joint bellows. Lack of lube will then ruin the drive unit.
When you removed the drive from the bellhousing you may have seen oil in the bellows.
This indicates a very serious condition that must be tended to while the drive is off.
It doesn't take long for all the oil to be forced out that front drive seal.
This type of failure usually requires replacment of the main front drive seal
and the pitted worn Yoke shaft. Simply replacing the seal is not good enough.
Sometimes we may find oil in the bellows even when there is no rust on the shafts.
This can occure because the seal can wear a groove in the yoke surface.
This worn groove will then ruin the seal and oil will leak out of the drive.
Be careful. Pressure testing the drive may not reveal a worn, grovved yoke.
A grooved yoke might only leak when warm and at higher RPM's.
Some techs will install a Speedi-Sleeve on a worn yoke to save a little money.
We do not recommend installing Speedi-Sleeves for this application.
The engine-end of the u-joint shaft also needs to be inspected.
The male splines need to be in good condition to prevent drive coupler failure.
Each spline should be flat on top. Sharpened or "mushroomed" splines are unacceptable.
Twisted splines indicate possible impact damage or improper shifting. Jumping waves
is a great way to twist splines. Replace all twisted shafts.
If you notice any aluminum dust on the splines it means that your coupler is failing.
Once the coupler starts to fail it must be replaced. Replacement of the coupler
requires removal of the engine.
If the splines look OK take a pick and clean out each and every spline groove.
Old grease gets dry and hard and builds up on the splines.
When installing the drive, use Mercruiser Spline Grease on the splines.
Spline grease holds up good under extreme pressures and stays soft.
Bell Housing and U-Joint Bellows
The Bell Housing is the section with the six studs that the drive bolts to.
It swivels up and down at the hinge pin pivot point.
Inspect the Bell Housing for cracks, corrosion or loosness.
Carefully inspect the area to which the aft end of the u-joint bellows clamps.
Water in the u-joint bellows can corrode away the seating lip where the bellows
needs to clamp thus allowing water to leak into the bellows.
Look into the cavity where the end on the shift cable and shift fork resides.
Does it look like water has been entering this area? If so... how?
A bad mounting gasket, a bad shift cable sheath or a bad shaft shaft seal can
allow water to run up the shift cable thus ruining it.
Read more about shift cables at Replacing your Mercruiser Alpha or Bravo Shift Cable
The U-Joint Bellows can rip allowing water to enter the bellows.
This is most likely the reason that you are reading this article.
Bellows need to be in good condition and properly installed.
The clamps need to be inspected and checked for electrolisys damage.
Wtare does not "magically" enter the u-joint bellows. You need to know how
the water got into the bellows or you might end up doing this job all over again.
Read more about replacing your u-joint bellows at Replacing Your U-Joint Bellows.
Inspecting Your Gimbal Housing
Sometimes refered to as the "shield" or "shroud", the Gimbal Housing is the
largest part of the transom assembly. It is sealed to the back of the boats transom.
The gimbal housing itself has no moving parts.
The gimbal housing assembly consists of a gimbal ring, bell housing,
bellows, shift cable, trim senders, gimbal bearing, water hose and other misc items.
The gimbal bearing fits tightly into the gimbal housing. It is hammered into place
with a set of special tools. See Special Mercruiser Tools.
Take a flashlight and carefully inspect the gimbal housing. Look around the edges of
where the gimbal bearing resides for cracks or water errosion.
You need to be particularily concerned with the lip that the u-joint bellows is clamped to.
If this lip has been erroded away from water sitting in the bellows it can ruin the gimbal housing.
The lip can be better inspected after the bell housing and bellows has been removed although
if you are confident it's OK and all you need to do is replace the gimbal bearing
then don't worry about removing the bell housing and bellows.
While you are here, check the upper seal where the upper steering shaft passes
through the gimbal housing. It is a thin oil seal which can fall out of place.
If the seal seating area is corroded away and the seal does not seal properly,
water will get up into the steering lever pocket inside the boat and cause all kinds
of rust and corrosion damage. Replacement of this seal requires removal of the bell housing
and gimbal ring. We suggest you review the procedures in the correct Service Manual.
Shift Shaft and Shift Shaft Seal
Once the drive has been removed from the bell housing it is easy to inspect
the stainless shift shaft and shift shaft seal.
A leaking shift shaft seal will allow water to enter the shift cable.
There is a gray lever attached to the top of the shift shaft.
below the lever, pressed into the bell housing, is a brass bushing and an oil seal.
Older units used a small brass bushing and a silly little oil seal that was prone to failure.
Mercruiser now makes a Shift Shaft Bushing Kit which improves the bushing and seal as to
reduce the chance of water leaking into the shift cable cavity area.
Read more at Replacing your Mercruiser Alpha or Bravo Shift Cable.
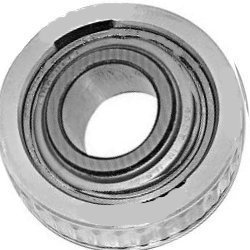
This is the most common gimbal bearing. It is part 30-60794A4 for $84.00
Click below to purchase this item.
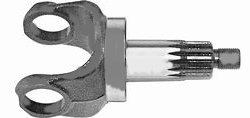 This is the Yoke for the gear end of the u-joint shaft.
The front drive main seal rides on the smooth surface of this Yoke.
If it is grooved or pitted it sould be replaced.
Click below to order part 46020--1 Yoke (new part number 46020T02 for $123.67) for MC, R, MR, Alpha One and some Gen II units.
What?! You didn't find what you need?
Then it's time to call our parts experts.
Give our parts guy a call. He will find your part!
Email us at Sterndrives.com
[Home][Email your Parts Request]